//(1) Print 0 1 2 ...9 to serial screen
for(int i = 0; i <10; i =" 100;" i =" 0;" i =" 0;" style="font-weight:bold;">i=i+2) {
Serial.println(i);
}
//(5) Print 0 1 2 ...999. You don't have to use i as a variable.
for(int longUselessVariable = 0; longUselessVariable <10000 ;longUselessVariable++ ) {
Serial.println(longUselessVariable );
}
//(6) The for loop can repeat any code between the { and the }
//Output 10 blinks then go to the next piece of code
for(int i = 0; i <10 ;i++) {
digitalWrite(ledPin, HIGH); // set the LED on
delay(100); // wait for a second
digitalWrite(ledPin, LOW); // set the LED off
delay(1000); // wait for a second
}
//next piece of code goes here
Tuesday, May 25, 2010
Test coming up
There will be a test on Thursday 4 May. This will take the place of the normal Thursday VC. The test will be on paper and an hour will be allocated for you to do it. It is a closed book test and no extra materials can be brought into class. At the end of the test, hand your answers back to your teacher who will get them back to me for marking.
There will be a question on the parts of the Arduino. Another part of the test will ask you to find the programming language mistakes in a buggy program. You will be asked to write a program that makes a LED blink in a simple way. There will also be questions about for-loops, random numbers and how to send outputs to the serial screen. There will also be a problem to solve involving testing some inputs and outputs on the Arduino. There may be some other questions. We will be going over much of the material the week before.
There will be a question on the parts of the Arduino. Another part of the test will ask you to find the programming language mistakes in a buggy program. You will be asked to write a program that makes a LED blink in a simple way. There will also be questions about for-loops, random numbers and how to send outputs to the serial screen. There will also be a problem to solve involving testing some inputs and outputs on the Arduino. There may be some other questions. We will be going over much of the material the week before.
Tuesday, May 18, 2010
Random numbers on the serial screen.
//Generating random numbers on the serial screen.
long randNumber;
void setup(){
Serial.begin(9600);
randomSeed(analogRead(0)); //shuffles the random numbers
}
void loop() {
// print a random number from 0 to 299
randNumber = random(300);
Serial.println(randNumber);
// print a random number from 10 to 19
randNumber = random(10, 20);
Serial.println(randNumber);
delay(50);
}
Your friend, the reference screen
Click to make the picture bigger. The reference screen in the Arduino help section is your best friend when programming.
Monday, May 17, 2010

Tuesday, May 11, 2010


Monday, May 3, 2010

The basic blink program
//This is the basic blink program.
int ledPin = 13; // LED connected to digital pin 13
// The setup() method runs once, when the sketch starts
void setup() {
// initialize the digital pin as an output:
pinMode(ledPin, OUTPUT);
}
// the loop() method runs over and over again,
// as long as the Arduino has power
void loop()
{
digitalWrite(ledPin, HIGH); // set the LED on
delay(100); // wait for a second
digitalWrite(ledPin, LOW); // set the LED off
delay(1000); // wait for a second
}
Tasks. Second lot. Write answers into your blog.
13) Get one to blink mostly on and the other is mostly off. "Mostly on" means it's on all the time except for a little flash off about once a second.
14) Like 13 but the LEDs are reversed. That is, the one that mostly on is now mostly off.
15) You're now up to task 15 and it's time get get your tasks marked. Send an email to peter.brook@op.ac.nz saying you've finished up to task 15 and send a link to your blog.
16) Get one led to blink twice then the other one to blink once then repeat forever.
17) Write a for-loop with counter variable i. Get one led to blink 5 times, using the for-loop, then the other to blink once. Repeat forever.
18) Like 17 but i can be any value. Try different ones. Later we can input this value from the keyboard.
19) Write a program to get one led to increase its rate of blinking from 100ms to1sec.
20) Same as 19 but this time ramp up the rate from 10ms to 1 sec then back down again.
21) Write a program to output one led blinking at rate of 200ms that outputs the word "blink" to the screen each time it comes on.
22) Same as 21 but this time use two leds of different colours and output the colour of the led to the screen each time it goes on. So you should see eg. "red yellow red yellow ..."
23) http://wwww.wikieducator.org/User:Peterb/HowManyArduinos0 put at least one Arduino variety, like Freeduino, into this wiki with a screen shot and put a link and a comment back into your blog so that it can be verified.
24) Go into the ladyada site and look at http://www.ladyada.net/learn/sensors/cds.html which deals with light dependent resistors. Put a link and comment about this page in your blog. Identify your LDR from your pack. You will not be tested on the technical details of this sensor but you'll be expected to insert it into circuits and read off the changing light values.
25) Run the ladayada photocell program that's in the ladyada site, URL above. Write it up in your blog about what you did and the program.
26) Same as 26 above but make some changes to improve it. Put your changes into a comment so that it's obvious what the differences are.
28) Write a program to turn a LED on whenever the light is blocked to your LED. You will have to play around with several values.
29) Random numbers. Run the random number program in a post above. Take a screen shot of your output and put into your blog.
30) Output random numbers between 1 and 6 to simulate lots of dice throws. Again, take a screen shot.
31) Experiment with the Ladyada LDR program to see what values it gives when dark and what values it gives when light. Write a program to output "Dark" when the value you get from the LDR is below a certain value and "Light" when when it's above that value. Sample at about once per second.
32) Now split the light intensity into three regions: Dark, Medium and Bright. Out put one of these words when your LDR makes a reading.
33) Final tasks: Please email peter.brook@op.ac.nz with a link to your blog, a comment about where you got to in the tasks, your LED project and your big project. You should aim to have 90% of the tasks done.
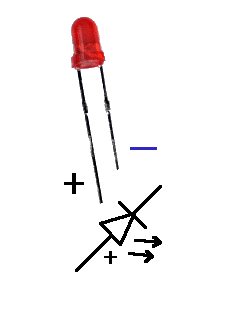
Getting two leds to flash.
/*
Blink2
Turns on an LED on for one second, then off for one second, repeatedly.
The circuit:
* LED connected from digital pin 13 to ground.
* Note: On most Arduino boards, there is already an LED on the board connected to pin 13, so you don't need any extra components for this example.
Created 1 June 2005
By David Cuartielles
http://arduino.cc/en/Tutorial/Blink
based on an orginal by H. Barragan for the Wiring i/o board
*/
int ledPin = 13; // LED connected to digital pin 13
int redLedPin = 12; // LED connected to digital pin 12
// The setup() method runs once, when the sketch starts
void setup() {
// initialize the digital pin as an output:
pinMode(ledPin, OUTPUT);
pinMode(redLedPin, OUTPUT);
}
// the loop() method runs over and over again,
// as long as the Arduino has power
void loop()
{
digitalWrite(ledPin, HIGH); // set the LED on
digitalWrite(redLedPin, LOW); // set the LED on
delay(500); // wait for half a second
digitalWrite(ledPin, LOW); // set the LED off
digitalWrite(redLedPin, HIGH); // set the LED off
delay(500); // wait for another half second
}
------------------------------------------------------------------------------------------------------------------------------------------------------------------
/*
Blink3
Turns on an LED on for one second, then off for one second, repeatedly.
The circuit:
* LED connected from digital pin 13 to ground.
* Note: On most Arduino boards, there is already an LED on the board
connected to pin 13, so you don't need any extra components for this example.
Created 1 June 2005
By David Cuartielles
http://arduino.cc/en/Tutorial/Blink
based on an orginal by H. Barragan for the Wiring i/o board
*/
int ledPin = 13; // LED connected to digital pin 13
int redLedPin = 12; // LED connected to digital pin 12
int del =500 ; //use this variable for any delays down below
// The setup() method runs once, when the sketch starts
void setup() {
// initialize the digital pin as an output:
pinMode(ledPin, OUTPUT);
pinMode(redLedPin, OUTPUT);
}
// the loop() method runs over and over again,
// as long as the Arduino has power
void loop()
{
digitalWrite(ledPin, HIGH); // set the LED on
digitalWrite(redLedPin, LOW); // set the LED on
delay(del); // wait for a second
digitalWrite(ledPin, LOW); // set the LED off
digitalWrite(redLedPin, HIGH); // set the LED off
delay(del); // wait for a second
}
Random numbers on the Arduino
/*
Blink
Turns on an LED on for one second, then off for one second, repeatedly.
The circuit:
* LED connected from digital pin 13 to ground.
* Note: On most Arduino boards, there is already an LED on the board
connected to pin 13, so you don't need any extra components for this example.
Created 1 June 2005
By David Cuartielles
http://arduino.cc/en/Tutorial/Blink
based on an orginal by H. Barragan for the Wiring i/o board
*/
int ledPin = 13; // LED connected to digital pin 13
int redLedPin = 12; // LED connected to digital pin 13
int del =500 ;//500;
// The setup() method runs once, when the sketch starts
void setup() {
// initialize the digital pin as an output:
pinMode(ledPin, OUTPUT);
pinMode(redLedPin, OUTPUT);
Serial.begin(9600);
}
// the loop() method runs over and over again,
// as long as the Arduino has power
void loop()
{
digitalWrite(ledPin, HIGH); // set the LED on
digitalWrite(redLedPin, LOW); // set the LED on
Serial.println("Red Low");
delay(del); // wait for a second
digitalWrite(ledPin, LOW); // set the LED off
digitalWrite(redLedPin, HIGH); // set the LED off
delay(del); // wait for a second
}
void setup(){
Serial.begin(9600);
randomSeed(analogRead(0));
for (int i=0; i<100; randnumber =" random(0,">
Fritzing


Fritzing is the name of a free curcuit drawing program that's designed for the Arduino. You can download it from the site on the first picture. You put components like leds and resistors on the breadboard and connect them up in a diagram like the lower picture.
You drag components from the options on the top left and put them onto the drawing. It's a good way of showing another person how your circuit is laid out.
If you click on the pictures on this page you get a big version you can see better.
Second led
You should by now be able to control the on-board LED and get it flashing at different rates.
We are now going to build a circuit for a second led that we put on the little extra breadboard because there's more room there.
Our aim is to get two leds flashing, one on board one on the little breadboard.
The remainder of the information is about leds.


/*
Blink
Turns on an LED on for one second, then off for one second, repeatedly.
The circuit:
* LED connected from digital pin 13 to ground.
* Note: On most Arduino boards, there is already an LED on the board
connected to pin 13, so you don't need any extra components for this example.
Created 1 June 2005
By David Cuartielles
http://arduino.cc/en/Tutorial/Blink
based on an orginal by H. Barragan for the Wiring i/o board
*/
int ledPin = 13; // LED connected to digital pin 13
int redLedPin = 12; // LED connected to digital pin 13
int del =500 ;//500;
// The setup() method runs once, when the sketch starts
void setup() {
// initialize the digital pin as an output:
pinMode(ledPin, OUTPUT);
pinMode(redLedPin, OUTPUT);
Serial.begin(9600);
}
// the loop() method runs over and over again,
// as long as the Arduino has power
void loop()
{
digitalWrite(ledPin, HIGH); // set the LED on
digitalWrite(redLedPin, LOW); // set the LED on
Serial.println("Red Low");
delay(del); // wait for a second
digitalWrite(ledPin, LOW); // set the LED off
digitalWrite(redLedPin, HIGH); // set the LED off
delay(del); // wait for a second
}
void setup(){
Serial.begin(9600);
randomSeed(analogRead(0));
for (int i=0; i<100; randnumber =" random(0,">
Sunday, April 25, 2010
Some videos to watch
Some videos to look at. The first explains the Arduino. They did it on "speak like a pirate day". Take a look at them then write a short review. See the tasks posting.

The classic intro on "talk like a pirate day"
Also: lots about LEDs:
More LEDs and good planning.
LED Pixel Matrix Project
Tasks. Write your answers into your blog.
Tasks. These are your assignements. Be able to show your program working on the VC and post your code into your blog for me to mark.
1) Start your blog by going into Blogger and just follow the simple instructions for creating a new blog. The first post should introduce yourself and upload of photo if possible or a picture of your dog or favourite computer or person etc. Just say who you are an a bit about interests, what IT knowledge you have especially with regard to microprocessors, computer applications, games, languages and skills that you have. If you've not done much in this field, it doesn't matter. Once you've done this send a link to Peter Brook at peter.brook@op.ac.nz
2) Have a look at the YouTube videos listed in another posting. Write a short review of each one. What's it about; what's in it; how did you find it for information or entertainment.
3) Do a search for two more Arduino based videos and provide a link and a short review of each one.
4) Copy the blink program into your blog. Get it running and then experiment with variations of the program in the tasks below.
5) Same as blink but this time make the blinking twice as slow. Put your new code, the whole program, into your blog but make sure you label it task 4.
6) Get the blinking to go very fast. Write your new program in your blog and add a comment about how fast you could go before your eyes couldn't see the blinking any more.
7) Write a program to get the on-board led to be on almost all the time but once per second it winks off but for a very short time.
8) Write a program to do the reverse of 7. That is, you should see the led as off most of the time but if you look hard you can see that the led winks on for just a little burst once a second.
9) List in your blog five things that have got leds built into them. Find one that does a flashing led and estimate how long it's on for and how long it's off for.
10) Download the fritzing program http://fritzing.org.
11) Make up the fritzing diagram just like the one in the fritzing post but put your components in slightly different places.. See if you can put a copy of your fritzing diagram into your blog with a comment about how it's the answer to task 11. It could go into another post as sometimes text and pictures don't mix too well.
12) Check out some cool projects using Arduinos in http://fritzing.org/projects/. Write down the project you liked best. We are doing most of these in the BIT degree at Otago Polytechnic. You may wish to investigate one of the simpler ones for your project due at the end of the course.
Welcome
Hi VC microprocessor students
It was good to meet most of you when you came to Otago Polytechnic.
Keep an eye on this blog for information and assignments. The work you're expected to do is in the Tasks section. Post your answers in your own blog which should come from Blogger like this one. In fact your first assignment is to start your own blog and send a link via my email: peter.brook@op.ac.nz so that I can read it and mark your assignments. Mostly, you'll work through tasks on the Arduino. Like the Blink example we did in class the other day in Dunedin. The Arduinos are yours to keep but please look after them as they'll cost over $70 to replace. You pass the course by completing all the assignments and passing one test at the end.
Ok, let's get going. Find the tasks and keep up to date with them. Try to keep ahead and spend plenty of time on the Internet looking at Arduino sites for information and ideas. See you on the VC.
PeterB
Subscribe to:
Posts (Atom)
