You should by now be able to control the on-board LED and get it flashing at different rates.
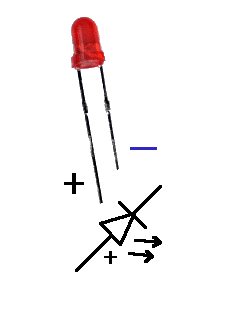
We are now going to build a circuit for a second led that we put on the little extra breadboard because there's more room there.
Our aim is to get two leds flashing, one on board one on the little breadboard.
The remainder of the information is about leds.


/*
Blink
Turns on an LED on for one second, then off for one second, repeatedly.
The circuit:
* LED connected from digital pin 13 to ground.
* Note: On most Arduino boards, there is already an LED on the board
connected to pin 13, so you don't need any extra components for this example.
Created 1 June 2005
By David Cuartielles
http://arduino.cc/en/Tutorial/Blink
based on an orginal by H. Barragan for the Wiring i/o board
*/
int ledPin = 13; // LED connected to digital pin 13
int redLedPin = 12; // LED connected to digital pin 13
int del =500 ;//500;
// The setup() method runs once, when the sketch starts
void setup() {
// initialize the digital pin as an output:
pinMode(ledPin, OUTPUT);
pinMode(redLedPin, OUTPUT);
Serial.begin(9600);
}
// the loop() method runs over and over again,
// as long as the Arduino has power
void loop()
{
digitalWrite(ledPin, HIGH); // set the LED on
digitalWrite(redLedPin, LOW); // set the LED on
Serial.println("Red Low");
delay(del); // wait for a second
digitalWrite(ledPin, LOW); // set the LED off
digitalWrite(redLedPin, HIGH); // set the LED off
delay(del); // wait for a second
}
void setup(){
Serial.begin(9600);
randomSeed(analogRead(0));
for (int i=0; i<100; randnumber =" random(0,">

No comments:
Post a Comment